
This presentation was given by Craig Miller on November 24, 2018 at the vicpimakers meeting at Camosun College.
(Deid’s gas.php program follows)
Creating a Webserver on the Pi with Docker
What is Docker?
Docker is a computer program that performs operating-system-level virtualization, also known as “containerization”. It was first released in 2013 and released under Apache 2.0 license. A Container is a lightweight application component including all the required elements (libraries, config, etc). Containers can be quickly started up without polluting your file system with libraries, and config files, and easily upgraded with one command.

Dochub
A repository of many docker container applications ready to be run, just note the name and run it!
Installing Docker on the Pi
- Older guide using apt-get
- Getting it directly from get.docker.com
curl -sSL https://get.docker.com | sh
However, it is a good idea to not run scripts off the internet, which will then run as root. So a better practice is:
curl -sSL https://get.docker.com > /tmp/docker_install.sh
vi /tmp/docker_install.sh  #look through the script
sh /tmp/docker_install.sh

#Executing docker install script, commit: 46dc063
+ sudo -E sh -c apt-get update -qq >/dev/null
[sudo] password for pi:
+ sudo -E sh -c apt-get install -y -qq apt-transport-https ca-certificates curl >/dev/null
apt-listchanges: Can't set locale; make sure $LC_* and $LANG are correct!
...
If you would like to use Docker as a non-root user, you should now consider
adding your user to the "docker" group with something like:

  sudo usermod -aG docker pi

Remember that you will have to log out and back in for this to take effect!

WARNING: Adding a user to the "docker" group will grant the ability to run
         containers which can be used to obtain root privileges on the
         docker host.
         Refer to https://docs.docker.com/engine/security/security/#docker-daemon-attack-surface
         for more information.
$
And docker is installed.
Setting up groups, so sudo isn’t needed
Setup Docker to be used by user pi without using sudo
sudo usermod -aG docker pi
newgrp docker
The usermod command modifies a user, in this case, appending the user pi to the docker group.
Usually once a group membership is changed, it does not take effect until one logs out and logs back in. But a faster way is to use the newgrp command which immediately logs the user into that group (the docker group in this case).
Testing the Docker Engine
docker run hello-world
A note about Architectures
Docker containers usually contain compiled code. This code is processor specific, such as x86, or ARM, and won’t run on the incorrect Architecture. On hub.docker.com (aka dochub), if the page doesn’t discuss architecture, then it is probably for x86, and won’t run on the Pi (which has an ARM processor). Depending on your Pi, you want to look for armhf (32 bit) or aarch64 (64 bit) architecture.
To determine your Architecture, type the following in a terminal window on the Pi.
$ uname -a
Linux 6pai 4.14.34-v7+ #1110 SMP Mon Apr 16 15:18:51 BST 2018 armv7l GNU/Linux
armv7l is a armhf architecture. At this time, all Raspberry Pis are running a 32 bit version of raspian (raspberrypi.org describes this as a benefit), even if your Pi has a 64 bit processor. Therefore, for the Pi, the architecture will always be armhf, for now.
Selecting a webserver: nginx
Nginx (pronounced engine-X) is a open source webserver that was released in 2004. From the onset, it was created as a high performance webserver. Netcraft shows that in October of 2018, nginx was the third most popular webserver in the world (at 19.7% after Apache’s 22.9% and Microsoft’s 39.2%).
Browsing DocHub
It is possible to browse dochub for containerized applications using your browser (e.g. Chrome, Firefox). This will be your primary documentation for the container and what parameters are required. In the example of nginx the linuxserver folks have created a unified image, so that you don’t have to worry about architectures. But this is currently the exception to the rule.
But once Docker is installed, it much easier to allow the Docker Engine to pull the container from dochub automagically. To install nginx webserver just use the following:
docker create --name=nginx -v /home/pi/nginx:/config -p 80:80 -p 443:443 linuxserver/nginx
The parts of that command
docker createinstantiates the containerized application with the associated parameters--name-nginxis an easy name to be applied to the app in future commands (like restarting the app)-v /home/pi/nginx:/configContainers operate in their own file system space and should be considered read-only. Any changes which occur inside the running container will be lost once the container is shut down. In order to provide read-write access to the container, part of the host file system is mapped into a directory (/config) inside the container.-p 80:80 -p 443:443Sets up ports 80 & 443 within the container to be exposed to the rest of the network, thus allowing access to the webserver.linuxserver/nginxis the unique creator/name-of-app to be pulled from dochub
Setting up nginx webserver
When using Docker containerized version of nginx, the /config directory will be populated with directories such as log, keys, php, when the container is run. It is not required that a sample config be created before running the container. However, sample Configs for nginx are available online.
A www directory must be created in the /config directory and populated with the content to be served by the web server.
Run it!
Once this is done, execute the docker restart nginx command, and your webserver on the Pi is up and running!
Test it
Point our browser to the nginx web server. Look for the PHP script gas.php (a US price/gal to Canada price/litre converter)
Limitations of Docker
Alas, Docker is very much an IPv4 application. On the network side, it is running evil NAT only exposing the ports of a container using the -p <port num> parameter. However if you wanted to run two versions of the nginx webserver, you must put them on different ports, since evil NAT does not allow multiple servers to serve on the same port with the same destination address.
The default IPv6 support is crippled. It appears as the host is an IPv6 listening port, such that the IPv4-only container is accessible via IPv6. However Docker is still acting as an IPv4 proxy, and the access.log will list the IPv4 address of Docker, rather than the actual address of the requesting host. It is possible to configure Docker such that each container has its own IPv6 address, thus getting around the limitation of one port contention. see Docker Documentation for configuring IPv6, but it is fraught with limitations (see the Good and Bad below).
Another example
Libresonic is a free, web-based media streamer, providing ubiqutious access to your music. Use it to share your music with friends, or to listen to your own music while at work. You can stream to multiple players simultaneously, for instance to one player in your kitchen and another in your living room
For armhf https://hub.docker.com/r/lsioarmhf/libresonic/
For aarch64 https://hub.docker.com/r/lsioarmhf/libresonic-aarch64/

docker create  --name="libresonic"  -v /home/pi/libresonic/config:/config  -v /home/pi/libresonic/music:/music \
 -v /home/pi/libresonic/playlist:/playlists  -v /home/pi/libresonic/podcasts:/podcasts  -p 4040:4040 lsioarmhf/libresonic

docker restart libresonic
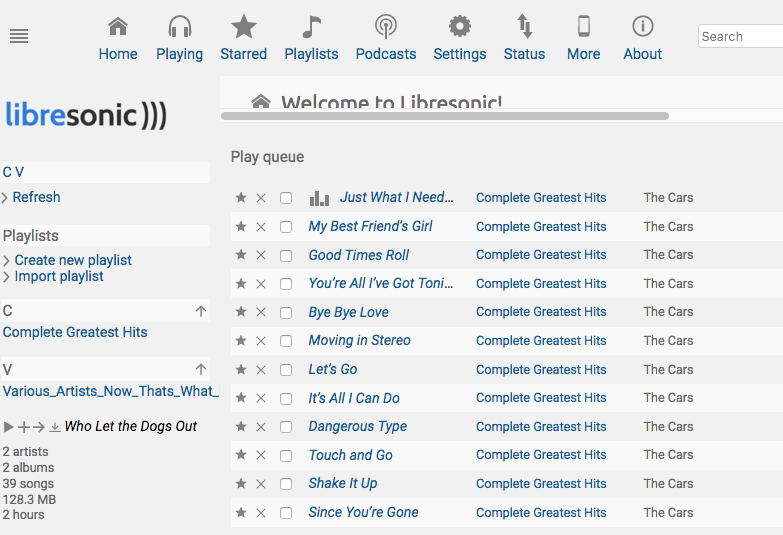
The LibResonic web interface listens on port 4040 (by default)
Summary
Docker is a light weight virtualization technology, allowing one to quickly stand up a services. It also enforces separate of application and config/user data. But one must be careful to get the correct image for your Architecture. And with the IPv4 focus and default use of evil NAT, Docker is inherently limited by legacy IPv4 thinking.
| Good | Bad |
|---|---|
| Network Defaults work well for IPv4 | Uses evil NAT |
| Quick to setup a service | Containers limited to Ports on host |
| Computing environment portability | No check on Architectures (x86, ARM) |
| Containerized Apps have reduced feature sets | |
| Proxy IPv4 service to IPv6 | Same limitations on ports as IPv4 |
| IPv6 is a bolt on using evil NAT | |
| IPv6 addressing is manual, no support for DHCPv6-PD | |
| IPv6 addressing dynamic, no connnection to DNS | |
| Docker is always in Routed mode, no transparent bridging | |
| Lightweight Virtualization | Poor to Bad IPv6 support, recommend a different VM technology e.g. LXC |
Useful Docker commands
docker version# show version of dockerdocker ps# show docker containers runningdocker images# show a list of imagesdocker container logs [name]# show logs from that container (good for debugging)docker volume ls# show mounted volumesdocker volume inspect ncdata# look at json info about volume ‘ncdata’docker rmi [image]# remove imagedocker run -it [image] bash# runs in interactive, attach to tty
23 Nov 2018
<html>
<head>
<link REL="SHORTCUT ICON" HREF="favicon.ico">
<meta name=viewport content="width=device-width, initial-scale=1.1">
<title>Gas Converter</title>
</head>
<body>
<?php
// Original code by Deid Reimer 2018
// Updated with embedded form by Craig Miller 6 Nov 2018
// always show the form
echo "
<form action=\"gas_converter.php\" method=\"POST\">";
//echo " <i>Beta</i>
";
echo " Enter US Gas Price in cents: <input type=\"text\" name=\"USPRICE\" />";
echo " <input type=\"submit\" value=\"Calculate it!\">";
echo " </form>
";
if (isset($_POST["USPRICE"]) == TRUE) {
// get the u.s. price from the query string
$pricePerGal = $_POST["USPRICE"];
echo "
<hr>
Results for: <b>",$pricePerGal, "</b>
";
// request the most recent rate from boc
$json = file_get_contents ("https://www.bankofcanada.ca/valet/observations/FXCADUSD/json?recent=1");
// convert the json to an array
$vars = json_decode($json, TRUE);
// grab the actual rate value, date and terms from the array.
$rate = $vars["observations"][0]["FXCADUSD"]["v"];
$date = $vars["observations"][0]["d"];
$terms = $vars["terms"]["url"];
//calculate the canadian cost per litre
$pricePerLitre = round($pricePerGal/3.785/$rate, 2);
// display the result
echo "<meta name=viewport content=\"width=device-width, initial-scale=1.1\">";
echo "<i>Rate info from <a href=$terms>BOC</a></i>
";
echo "Exch Rate: $rate
Date: $date
";
echo "US Gal: $pricePerGal
CA Litre: $pricePerLitre\n";
}
?>
</body>
</html>