by Craig Miller
Outline
- What is VNC?
- Why would you want to use VNC?
- Basic Networking
- VNC Server, VNC Client
- Other remote GUI methods
Virtual Network Computing
Created by Olivetti & Oracle Research Lab in Cambridge, United Kingdom in 1999. AT&T squired the lab in 2002, and closed it down. VNC provides a means to see a remote graphical interface (GUI).
The VNC code was released under GPL, and is open source. It has been ported to almost everything, including the Raspberry Pi.
Why use VNC
VNC shows a GUI interface, much like remote desktop for Windows, but as mentioned, it is cross platform.
There are GUI based applications which can make it easier to use the Raspberry PI, such as a GUI-based editor like gedit, or any remote machine. VNC allows you to run those GUI applications (inside a VNC window).
An advantage of VNC, is that the GUI window stays persistent between connections. This allows you to set up work, and reconnect later, and pick up where you left off.
Basic Networking
Back in the 90s there were many network protocols. Then they all died out except IP, Internet Protocol. And IP became the basis of networking for almost everything since.
But there was a problem with IP, known as early as 1993, there was a limited number of addresses, fewer than the number of people on the planet. So a new version of IP was created, and now there are two versions in play:
- IPv4 – Created in 1980
- IPv6 – Created in 1998
IP Basics
An IP address has two parts:
- Network part – first part of the address
- Host part – last part of the address
For example an IP address such as 192.168.10.11/24, The /24 indicates how many bits are part of the Network Part, and the remainder are the Host Part.
In IPv4, a 32 bit address, you will see a common /24 network, where the last number of the IP address can be in the range of 1-255 (the range represented by an 2^8, or 8 bit number)
In IPv6, a 128 bit address, the networks are always /64, so the last 4 quibles of the address will be the host part (2^64 or a 64 bit number). Clearly the range of host addresses is much more than 255.
Connecting to VNC
When at your house, connecting to a Raspberry PI via VNC, you will connect to the Pi on the same network. That is the first part of the IP address will be the same (or the network part of the address will be the same.
If you want to connect outside of your house/office, then you will need to put in firewall rules to allow incoming connections on TCP port 5900.
With IPv4, you really only need to know the last number of the address since the network part will be the same. Using the example address above, you would connect to the Pi at 192.168.10.11 port 5900 (the VNc port).
With IPv6, it is probably easiest for you to manually assign an easy to remember address like FD01::11, then you would connect with VNC to FD01::11 5900 (the VNC port).
You can assign an ip address with the ip command.
sudo ip addr add fd01::11/64 dev eth0
Setting up and starting the VNC Server
But before we can connect, we must install a VNC server application on the Pi, and run it. VNC consists of two parts, the server runs on the Pi, and the client which runs on the screen (Windows, Mac, Linux, BSD, Amiga, Chromebook, Android, iOS) in front of you.
There are multiple servers that have been forked off the original Olivetti & Oracle Research Lab VNC project.
| VNC | Comments |
|---|---|
| Real VNC | Free and Commercial Versions, secure communications over ssh |
| Tight VNC | Free for private and commercial use, IPv4 only |
| vnc4server | Opensource package available in many distros, supports both IPv4 and IPv6 |
Download the Server and install it. From the Pi command line:
sudo apt-get install vnc4server
Start the server on the command line:
 $ vnc4server

You will require a password to access your desktops.

Password:
Password must be at least 6 characters - try again
Password:
Verify:

New 'raspberrypi:1 (pi)' desktop is raspberrypi:1

Creating default startup script /home/pi/.vnc/xstartup
Starting applications specified in /home/pi/.vnc/xstartup
Log file is /home/pi/.vnc/raspberrypi:1.log

$
The server is now running and ready to accept connections from your client.
A word about Unix/Linux/VNC displays
Unix/Linux/VNC have the concept of multiple displays. Think of this as a separate desktop shown to each logged in user. This allows user A to see and use one set of applications, while user B sees their own desktop.
VNC expands on the multiple desktop idea, by creating virtual displays, since users C, D, and E are connecting via the network, each with a unique display.
Displays are numbered from zero, :0, and additional displays follow as :1, :2, and so on. In the example above, the VNC server is creating display :1, because :0 is already being used (by the attached monitor).
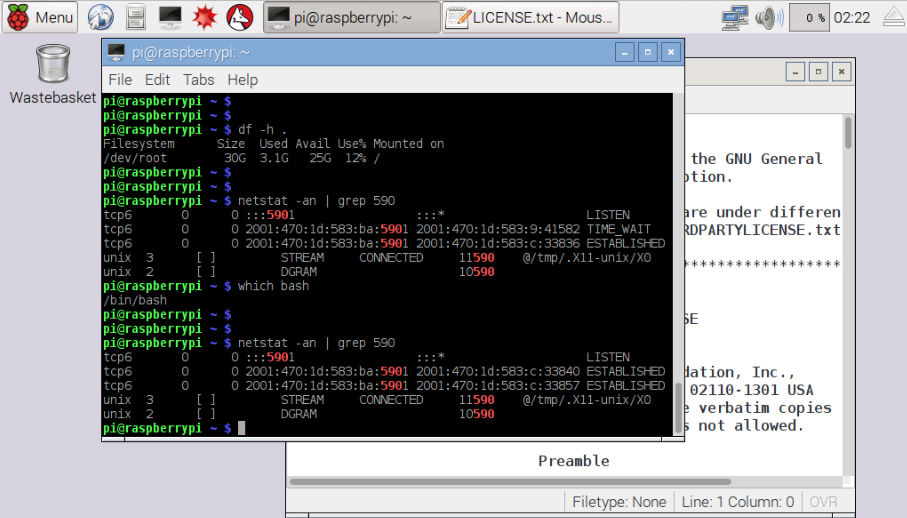
VNC port numbers start at 5900 for display :0, and count up, 5901 for :1, and so on.
Connecting with the Client
The interface is different for each client, but it always asks:
- address or name of server
- port number (usually 5900, 5901, 5902, etc)
- password
Sometimes the address/hostname and port number are written in a single line:
- 192.168.10.11:5900
- [fd01::11]:5900
- 6vm32:6900
Because IPv6 addresses use colons to separate the quibbles, the address must be put in braces to separate it from the port number
Other GUI methods
Before there was VNC, a GUI method for Unix (and then later Linux) was developed by MIT in the mid 80’s. It was called X-Windows. But unlike other windowing systems, X-windows had the capability to separate the application and the display across a network. X-Windows also uses a client/server architecture, but it seems reversed. The screen in front of you (Window, Mac, Linux…) is the server and the application running on the remote machine is the client.
The easiest way to start an X-Windows application is to use ssh to forward the display back to your X server. This is easily done by:
ssh -X remote-host
Or if you on Windows, there is a checkbox in putty which will forward the display back to your windows X server such as xming
The advantage of using X-Windows is that it is reasonably fast, and integrates well into your desktop, showing up as just another window (rather than the whole remote desktop).
The disadvantage is that it is not persistent. When you reconnect (via ssh) your window will be gone.
Demo
Problem: desktop is all grey
Solution: edit ~/.vnc/xstartup, remove comments as per instructions
# Uncomment the following two lines for normal desktop:
 unset SESSION_MANAGER
 exec /etc/X11/xinit/xinitrc
Kill running vnc server vnc4server -kill :1 and restart vnc4server
Finally, the Desktop!