In this tutorial we are going to look at the filesystems on the Raspberry Pi and how they are used to boot Linux from an SD card. This is the only officially supported boot method available on the Raspberry Pi and although this is specifically written with the Raspberry Pi in mind, many other boards can function in a similar fashion. To begin, we need to understand the basics of filesystems since the SD card contains several partitions with different types of filesystems. On Linux and Unix operating systems, the df utility can be used to check disk space, mount points and filesystem types, among other things. It is a very useful tool to know what filesystems are available and where each is mounted, as some of these may vary by distribution or platform. Running the df -Th (-Th tells df to display filesystem types and the size in human readable format respectively) command on the Raspberry Pi, we can see that there are several different filesystems mounted.

Understanding the output of df is important to understand how Linux operates. The first thing to note from the output is there is a mount point called /boot. This existance of this mount point indicates that the device most likely booted off a filesystem. In many embedded systems, the operating system boots directly out of raw flash memory. Supporting a filesystem based approach makes it easier to upgrade and harder to brick. The user need only update the files on the SD card using a regular computer and off it goes. Now, you might be wondering how the Raspberry Pi booted off a filesystem. Well let’s take a look.
Filesystems – General Overview
A filesystem is a piece of software, usually part of the OS (but not necessarily) that stores data onto some type of non-volatile memory. It translates generic operating system calls such as open/close/read/write etc… into its own format and then stores the data on the media. There are many different types of filesystems, some of which are designed for general purpose use, while others are for specific types of hardware (i.e. flash, hard disk, etc…) or performance requirements (i.e. servers and data centres).
Let’s start by looking at some examples of different media. On embedded systems, the typical memory of choice is flash, so we will concentrate on this. However, there are many types of flash. The two main categories are raw flash and managed flash. In the category of raw flash memory the two most popular types are NAND and NOR. These typically come with either a serial interface – such as SPI – or a parallel interface. Although NAND and NOR are fundamentally different technologies, they both work using the concept of sectors or blocks (sector is for NOR, block is for NAND). A block is the smallest section of memory which can be erased at a time. On these types of devices, you cannot write over existing data. When data needs to be written, the block must first be erased which sets all the bits to ‘1’. Once a the block is erased, data can be written in bytes, words or pages depending on the device.
As you can imagine, writing to a raw memory device requires some additional software to be able handle all these details. This can degrade performance and is extremely complex. To make things worse, erasing a blocks can take a very long time – on the order of seconds.
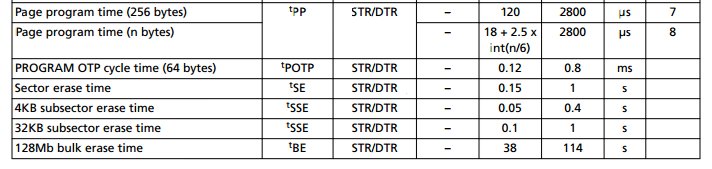 Example of timing characteristics of a Micron NOR Flash (datasheet)
Finally, both have a limited number of erase cycles. When erased too many times. blocks can go bad and no longer able to be erased or can corrupt data when it is written or read. On a NOR flash device, this is typically upwards of 100000 erase cycles, while on for some higher density NAND devices it can be as low as 3000 program/erase cycles. The physics behind bad blocks is different between the two technologies, but the point is that special algorithms are required to spread writes across the device so that one specific block is not erased continuously. These algorithms are called wear levelling. Both wear levelling and keeping track of bad blocks is the responsibility of the filesystem. Examples of filesystems for raw flash memory devices are UBIFS, YAFFS.
The other category of flash memory technology is managed memory. While most often the underlying memory is NAND based, these devices manage bad blocks and wear levelling without any software interaction. They have their own memory controller and firmware built into them which does all the wear levelling and bad block management for you. SD cards as well as (e)MMC and USB keys are all examples of managed memory. Because managed memory handles everything flash specific in hardware, you can run any generic filesystem on the device with reasonable confidence.
SD cards typically use the FAT filesystem. FAT stands for file allocation table, which is in reference to the way the filesystem stores metadata for the volume. FAT has a few different flavours which depend on the device size such as FAT16, FAT32 and exFAT. FAT32 is the defacto standard for most bulk memory devices such as USB keys, SD and MMC cards. That is because it is well known and relatively easy to understand and implement, especially for resource constrained environments. FAT is sometimes referred to as vfat, or a DOS filesystem.
The Raspberry Pi Boot Partition
Devices such as the Raspberry Pi don’t just boot straight into Linux. They have a bootloader which runs first and loads the operating system. What you might not know though, is that there are actually several stages of bootloader that run, each one responsible for setting up some specific hardware feature in preparation for the next stage. This is very common on other devices in this class such as the Beaglebone. The first stage bootloader is often called the ROM boot because the firmware is burned directly on the chip during manufacturing so it cannot be updated. Hence it makes sense for the chip designers and firmware engineers to support a very well known, widely implemented, easy to implement filesystem such as FAT. The ROM boot on the Raspberry Pi actually runs on the GPU – not the CPU – and its job is to read the SD card’s FAT32 filesystem, search for a file called bootcode.bin, load that file into memory (cache at this point), and then run it. Cracking open the /boot directory we saw using df, we can begin to see how the boot process works.

We can see here in in the /boot directory there is the file called bootcode.bin. This is the second stage GPU bootloader. It is responsible for setting up the SDRAM and loading the GPU firmware from the SD card. SDRAM is required at this point most likely because the cache is not big enough to load the GPU firmware. The other component of the bootcode.bin is an ELF loader. This is required because the GPU firmware is start.elf. An ELF file is a type of object file which is created as the out of the compiler. It contains the machine code but also contains information about where to load each section of code into memory.
The GPU firmware is responsible for reading configuration data out of the SD card and loading the kernel. There are several of files in the directory which are part of this process:
- kernel.img: the kernel itself in the zImage file format – a type of compressed image
- fixup.dat: partitions the SDRAM between the GPU and CPU.
- *.dtb: the device tree blobs and overlays (in the overlays directory)
- cmdline.txt: the kernel command line parameters
- config.txt: more OS configuration
We’ll go into these in a bit more detail shortly but to finish on up with the GPU firmware, once it has loaded all these files into memory, it then when control is transferred from the GPU to the CPU.
Device tree
All the files with the .dtb extension are device tree blobs (.dtb). The device tree is an open standard which is used to describe the hardware. Using a device tree, there can be a single kernel image compiled which can support multiple boards using the same processor. In older versions of the kernel, there was a C file which described the hardware, meaning the hardware support was compiled directly into the kernel. There are multiple .dtb files to support the multiple revisions and types of Raspberry Pi boards. The bootloader chooses the file that is applicable for the board it is running on and reads the correct device tree out of the SD card. It is then passed to the Linux kernel, which upon boot, loads the appropriate drivers based on what it finds in the device tree. Here is an example device tree file from the Raspberry Pi Model B. Device trees are written in plain text and using the syntax shown in the example. There are many specifications depending on the architecture, driver type, etc… The plain text device tree file that humans write has the extension .dts. It is compiled to a binary .dtb file using a device tree compiler.
Inside the boot directory there is another directory called ‘overlays’. This contains a several device tree overlays that can be enabled using the config.txt file. The GPU firmware combines the base device tree blob with any overlays that have been defined in config.txt. This allows you to easily add support for other hardware peripherals, assuming compatible support for them is compiled into the kernel (or included as a kernel modules).
Root Filesystem
There is one more crucial component required by the Linux kernel to boot – the root filesystem (rootfs). The kernel image only includes the low level components – the actual kernel, the drivers and some utilities. By itself, it is pretty much useless. The rootfs contains everything else that we think of when we use a Linux distro – all the user level features and system utilities. After the kernel loads all the drivers, it looks at the rootfs and calls the init program. Depending on the distro built, the initialization can change substantially, but basically it will load all the user facing features like the console and command line, user support, a graphical interface if there is one, etc… All the standard Linux utilities we use on a daily bases are built as part of the rootfs.
Going back to our output of df once again, we can see the first entry is /dev/root, which is mounted at /. This is the root filesystem. However, one thing to note here is that /dev/root is not actually a device. The kernel command line parameters tell us the actual device is on /dev/mmcblk0p7, where mmblk0 represents the SD card interface and p7 represents the partition on that device. Remember how we said earlier that the SD card was formatted with FAT32. Well, in reality only one partition was. The NOOBS installer actually partitions the SD card into several partitions. This partition happens to be for the rootfs and is formatted as ext4. Ext4 is a Linux specific filesystem – a journalling filesystem commonly used on almost every mainstream Linux distrobution. But this is running on an SD card you say? Yes true, an SD card as we saw earlier is managed memory. Therefore we can treat it just as you would a regular hard drive. In fact, solid state drives (SSD) use the same memory technology as SD cards, USB keys etc… there’s just much more of it.
So what is in the rootfs? Well the rootfs is defined by the Filesystem Hierarchy Standard (FHS) which was created by the Linux Foundation to help standardize across distributions. Let’s have a look:
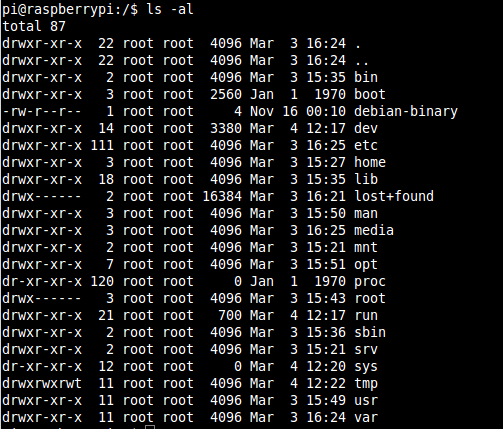
Below is a brief description of each one, paraphrased from the specification with some of my own commentary:
/bin: directory where system executables (such as commands) go and are available to all users.
/boot: contains all the files required by bootloader to boot the kernel.
/dev: this directory is not actually part of the rootfs, it is created each time on boot and contains files that represent each of the devices which can be accessed in user space (look at the output from df to see that it is a special type of filesystem called devtmpfs).
/etc: where system and application configuration files are stored.
/home: contains another ‘private’ directory for each user. All of the user’s personal files are typically stored in here. My documents, desktop, download etc.. all make up the a user’s /home directory.
/lib: the directory where shared libraries and kernel modules are stored. When you compile and need to link in libraries, this is one directory where you would typically point the linker to.
/media: the default mount point for removable devices – for example, if you plug in a USB key
/mnt: Is the default mount point temporary filesystems (i.e. network shares)
/opt: Used to be where some third party applications are installed, supposed to be for add-on applications.
/proc: another virtual directory which is not really part of the root filesystem. In it are files which represent each of the processes in the system.
/root: the home directory for root
/run: a directory for applications to store data during runtime. This is not actually part of the rootfs, it is a temporary directory created at runtime.
/sbin: contains executables like the /bin directory, but these are typically for use only by the system and administrator.
/sys: another virtual filesystem which exposes some of the hardware interfaces in the kernel. It provides a way to see the kernel’s configuration of the hardware. Though not recommended, you can access some hardware through this interface (i.e. read/write GPIOs, LEDs, etc)…
/tmp: a temporary filesystem, not actually part of the filesystem. Essentially a RAM disk which can be used by applications and the system to store temporary files
/usr: a directory where user application binaries, libraries, header files and documentation are stored.Typically files in here are all read-only. In some distributions this directory is on a separate partition from the root filesystem.
/var: another directory where application runtime information can be stored so that it doesn’t end up in the /usr directory. Normally used for logs, locks. Some functions replaced by the /run directory but kept for compatibility.
An important thing to keep in mind is that different distributions, applications, etc… manage and use these directories differently. It is not always so cut and dry, and to maintain compatibility many distribution maintainers prefer to keep legacy files and directories around rather than deprecating them. The FHS specification contains guidelines on how applications should use these directories, but that doesn’t mean all application developers follow them. It is just a guideline and will vary even from version to version of the same distribution or application.
What is important to take away from all this is that the root filesystem is imperative to operation of Linux. You can boot the kernel, but not much will happen afterwards. The filesystem can be built to suit your own needs – include specific utilities, applications, etc.. giving you the freedom to have a really big filesystem – such as Ubuntu’s which requires 4GB straight out of the box – to a really small filesystem – I have built one that is approximately 12MB and it’s still too big! Either way, its up to you and it’s a great exercise to try out, but that’s for another tutorial!