by Gordo
One of the many cool things you can do with your Raspberry Pi is to add a specific $20-$30 DVB-T USB dongle and install some software to turn your Pi into a real-time flight virtual radar (for radarspotting) or data feeder to FlightRadar24.com (FR24) and FlightAware.com (FA). In return both sites offer enhanced memberships while you maintain your feed to them. A real bonus for aviation enthusiasts!
Overview
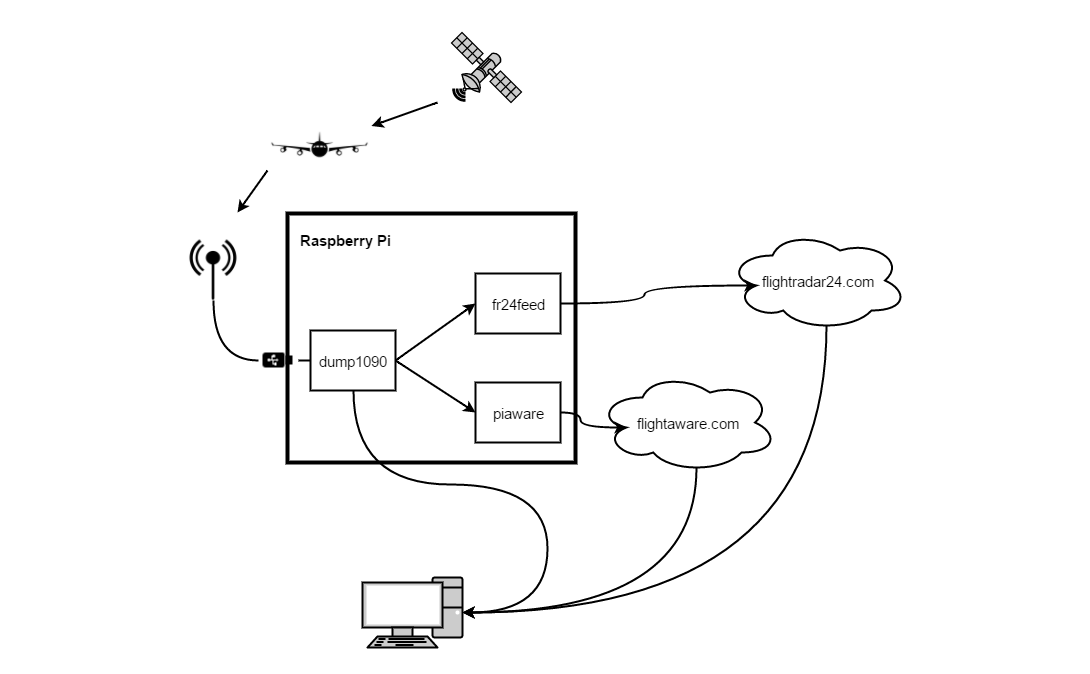
When an aircraft is in flight, it transmits data at regular intervals to ground stations either by an ADS-B or a MODE-S transponder at a frequency of 1090 MHz. If the aircraft is equipped with an ADS-B transponder, it reports its GPS position and air speed, in addition to identifying information and altitude. MODE-S transponders only identify the aircraft and its altitude. Both FR24 and FA then derive the position of these aircraft using MLAT (Multilateration).
With a DVB-T USB dongle attached and dump1090 software installed, your Pi will be able to receive and decode the ADS-B and MODE-S transmissions. This is achieved by dump1090 tuning the dongle to the frequency and then outputting the decoded data. FR24 and FA software then takes this output and forwards it to their respective servers. This crowd-sourced data helps augment the data these companies receive from official channels, such as the FAA.
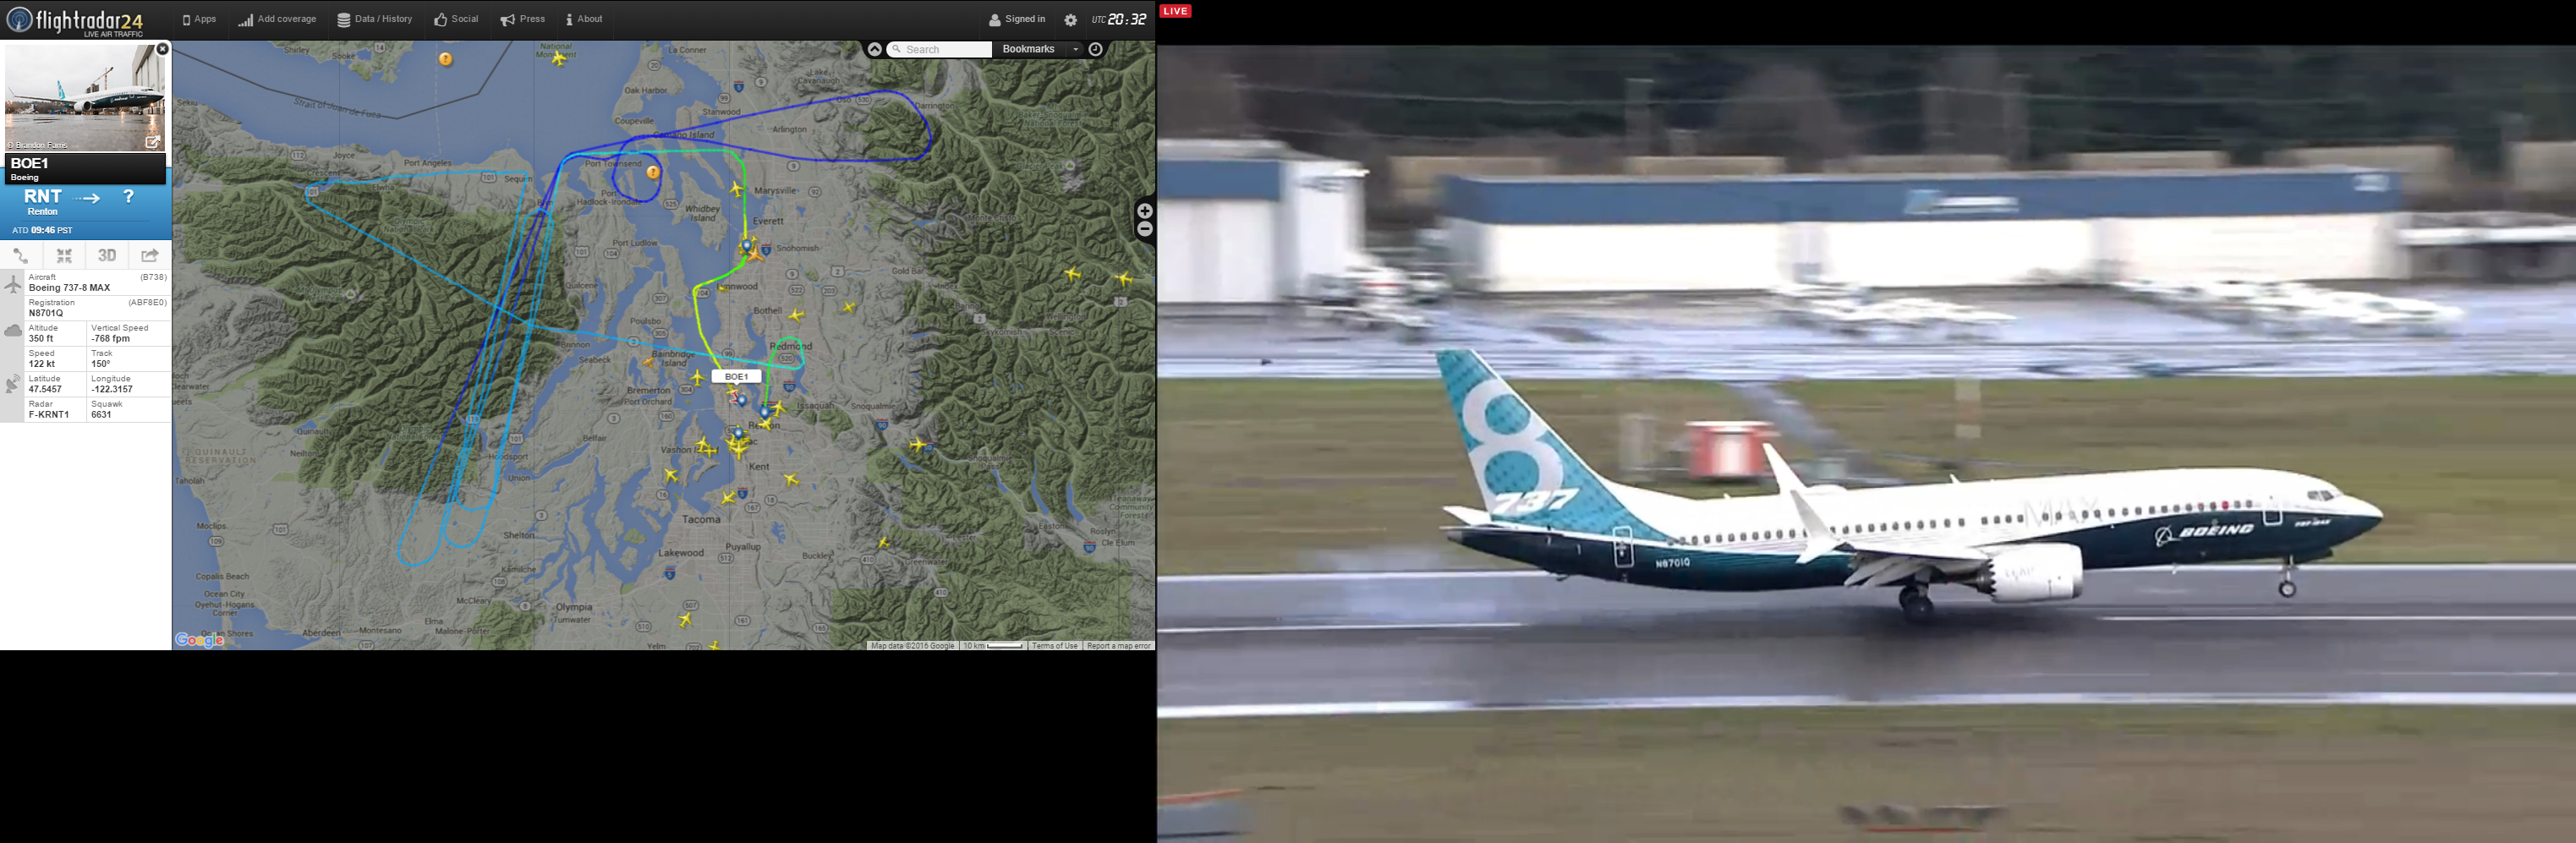
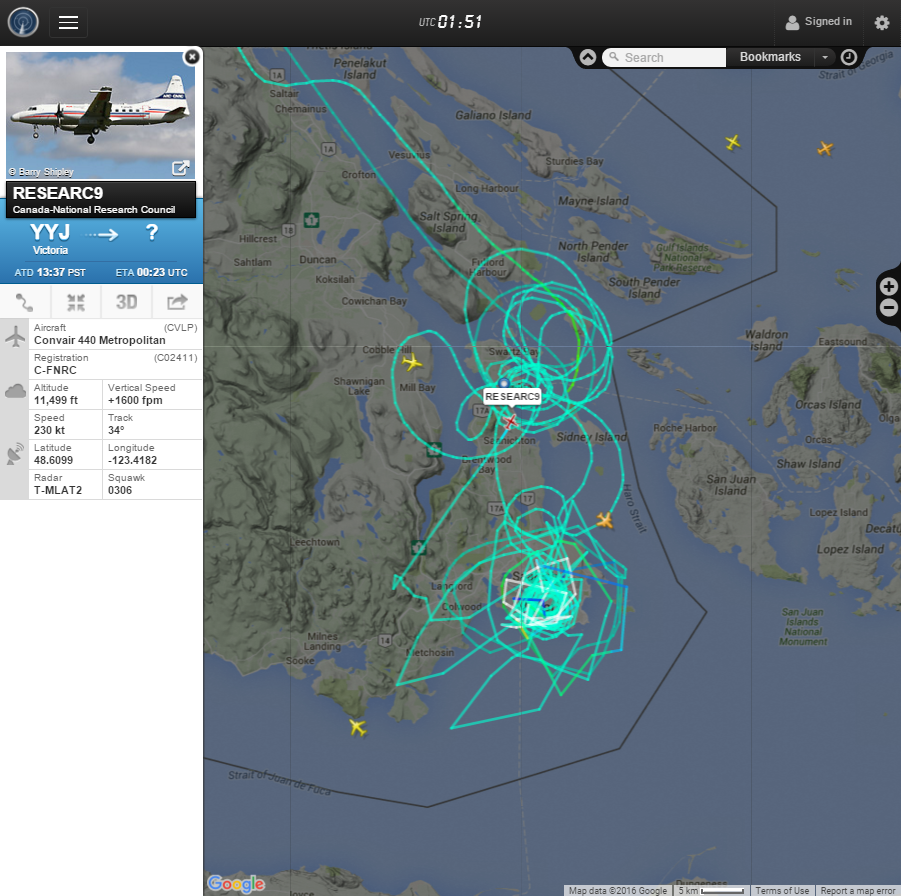
You can then view a virtual radar representation of your feed via the built-in dump1090 web server. FR24 and FA offer more comprehensive virtual radar maps on their feature rich sites.
Requirements
- DVB-T USB dongle based on the Realtek RTL2832U with the Rafael Micro R820T or R820T2 tuner. (The NooElec NESDR Mini 2 is recommended. I currently use the older NooElec TV28Tv2.)
- One USB 2.0 port. (Keep in mind the USB dongle is quite large and can interfere with access to other ports.)
- Raspbian Wheezy or Jessie (full or lite) either installed via NOOBS or from an image is fine.
- Location for the antenna with no obstructions — outside or in a window is best.
- [optional] Account(s) with FlightRadar24.com and/or FlightAware.com, if you plan to feed data. (Setting up the accounts and requesting feeder keys is beyond the scope of this post.)
- [optional] Latitude, longitude and altitude of antenna position, if you plan to use MLAT. (If your smartphone’s built-in GPS only shows latitude and longitude, you can use a third-party app to get the altitude. Another option is to use FreeMapTools Elevation Finder or similar to obtain your approximate latitude, longitude, and elevation. If you use the website, remember to then add the height of your antenna from the ground elevation to get the altitude.)
- [optional] SSH access, if you plan to operate your Pi headless or remotely.
- [optional] Static IP, if you want a fixed address to access the dump1090 web server, make a SSH connection, or use dynamic DNS behind your network.
Installation
We will set up the FR24 feeder first. This package includes a fork of dump1090, with MLAT support, which we’ll use to provide data to both FR24 and FA feeders.
With each command line, I’ve included screenshots of sample output for your reference. Keep in mind that your output might differ depending on your system’s configuration and current state.
FlightRadar24.com Feeder Installation
These manual instructions are based on the those found within the FR24 forum post New Flightradar24 feeding software for Raspberry Pie [sic].
-
Import FR24 signing key
gpg --keyserver pgp.mit.edu --recv-keys 40C430F5 -
Add new key to list of trusted keys
gpg --armor --export 40C430F5 | sudo apt-key add - -
Add FR24 repository to sources
sudo sh -c "echo 'deb http://repo.feed.flightradar24.com flightradar24 raspberrypi-stable' >> /etc/apt/sources.list" -
Update the cache
sudo apt-get updatescreenshot (new sources highlighted for your reference)
-
Install fr24feed feeder
sudo apt-get install fr24feed -
Run the sign-up wizard (even if you already have a sharing key)
fr24feed --signupThe actual signup process is quite verbose so I’ve attached an example walk-through in this screenshot.
Two things to mention about the configuration process:
- Step 4.3 type the values
--net --net-bi-port 30104. The first argument--netwill instruct dump1090 to enable the built-in web server and--net-bi-port 30104is required by the PiAware feeder. - Step 6A and 6B disable logging unless you are debugging an issue with dump1090 as it writes a lot of information to the logs and SD cards have a finite number of writes before they are damaged.
- Step 4.3 type the values
-
Restart the feeder
sudo service fr24feed restart -
Test the feeder status
sudo service fr24feed status
FlightAware Feeder Installation
With dump1090 installed and configured as part of the FR24 feeder installation, we can proceed to install the FA feeder.
These instructions follow those in sections two through four on PiAware – dump1090 ADS-B integration with FlightAware ✈ FlightAware.
-
Download the PiAware feeder package
wget http://flightaware.com/adsb/piaware/files/piaware_2.1-5_armhf.deb -
Install the package
sudo dpkg -i piaware_2.1-5_armhf.debYou will get an error message about dependencies not being installed.
Don’t worry! This will be corrected in the next step!
screenshot -
Install the required dependencies
sudo apt-get install -fy -
Enable automatic and manual PiAware software updates
sudo piaware-config -autoUpdate 1 -manualUpdate 1Note: Manual updates are performed via your FA profile page.
-
Configure PiAware with your FA account credentials
sudo piaware-config -user <username> -passwordNote: Substitute <username> with your own FA username. After issuing the command, you will be asked for your FA password.
-
Restart the feeder
sudo service piaware restart -
Test the feeder status
sudo service piaware status -
Delete the PiAware feeder package
rm piaware_2.1-5_armhf.deb
dump1090 Virtual Radar
With the --net argument passed to dump1090, it will also act as a web server on port 8080. To view the virtual radar web page, visit http://192.168.1.31:8080/ using your browser. (Remember to substitute 192.168.1.31 with the IP of your Pi.)
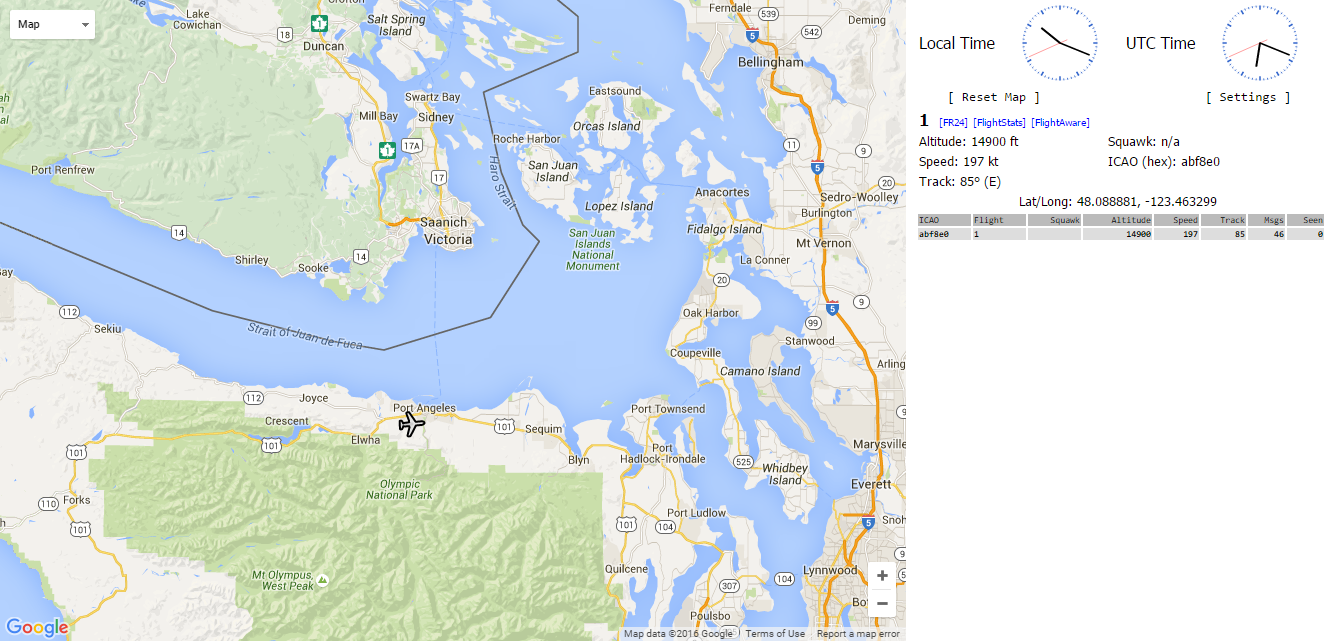
If dump1090 is running, you will see a Google Map featuring Europe. Once you pan and zoom the map to your location, it should look similar to the screenshot below and, if there’s any air traffic in the area your receiver can pick up, those flights will be displayed.
Keep in mind that only flights transmitting ADS-B data are represented on the map because MODE-S doesn’t send position information. All flights detected will be listed in the right hand side.
FlightRadar24.com and FlightAware.com Profiles
Each website provides a profile page with some statistics about your feed. FA is far more comprehensive and you can even send commands to your Pi from your profile page. FA is also configured by default to alert you by email if your feeder is down.
The directions to the profile page for each site are as follows:
FlightRadar24.com
- Visit https://www.flightradar24.com/premium/
- Click on the Premium button in the upper right
- Sign in with your credentials
- Click on the Your Feeds in the collection of buttons to the right of the Your Account heading
- Click More info
FlightAware.com
- Visit https://flightaware.com/
- Click the Login link near the upper left
- Sign in with your credentials
- Click the My ADS-B link near the upper left
Conclusion
A Raspberry Pi with DVB-T USB dongle and open source software installed, works out to be a more affordable option for hobbyists when compared to the expensive higher-end ADS-B virtual radars such as the Radarcape or AirNav RadarBox or dedicated decoders like the Mode-S Beast or Kinetic SBS models. Plus your costs are effectively offset by the premium memberships within a short period of time. This basic configuration can also be extended by adding a high gain antenna and filter to improve reception as well.
Screenshot Gallery