
Introduction to Node Red
ESP8266 and Raspberry Pi
After Greg’s presentation on Over the Air Programming where he demonstrated the use of Node-RED to create a web page for IOTs I have been curious and decided to learn a bit. I used my favorite ESP8266 Arduino like board that was programmed to read the temperature from a DS18B20 1 wire bus temperature sensor.
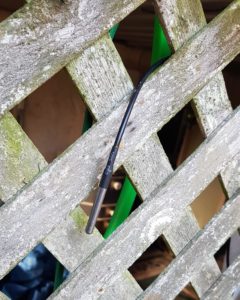
The ESP8266 and DS18B20 that I used to check this out has been running for about a year under my back deck.
If you missed Greg’s presentation Node-RED, is becoming a favorite of Internet of Things folks.
From the Node-RED web site:
Node-RED is a flow-based programming tool, original developed by IBM’s Emerging Technology Services team and now a part of the JS Foundation.
Flow-based Programming
Invented by J. Paul Morrison in the 1970s, flow-based programming is a way of describing an application’s behavior as a network of black-boxes, or “nodes” as they are called in Node-RED. Each node has a well-defined purpose; it is given some data, it does something with that data and then it passes that data on. The network is responsible for the flow of data between the nodes.
It is a model that lends itself very well to a visual representation and makes it more accessible to a wider range of users. If someone can break down a problem into discrete steps they can look at a flow and get a sense of what it is doing; without having to understand the individual lines of code within each node.
History
Node-RED started life in early 2013 as a side-project by Nick O’Leary and Dave Conway-Jones of IBM’s Emerging Technology Services group.
What began as a proof-of-concept for visualising and manipulating mappings between MQTT topics, quickly became a much more general tool that could be easily extended in any direction.
It was open-sourced in September 2013 and has been developed in the open ever since, culminating in it being one of the founding projects of the JS Foundation in October 2016.
For some more of the history and highlights:
read our blog post announcing the move to the JS Foundation.
watch Nick’s talk from Monki Gras 2016 :
The Project
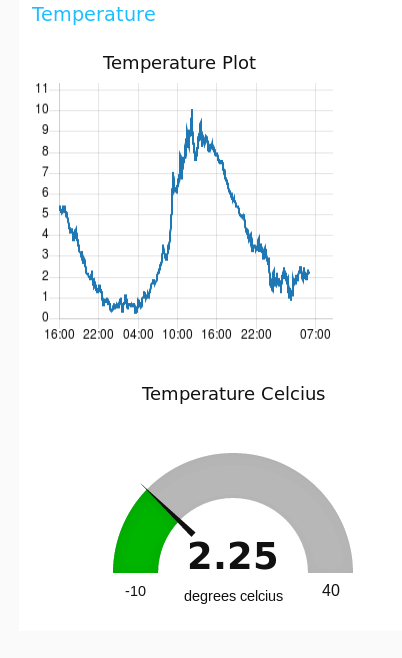
The display we are going to achieve

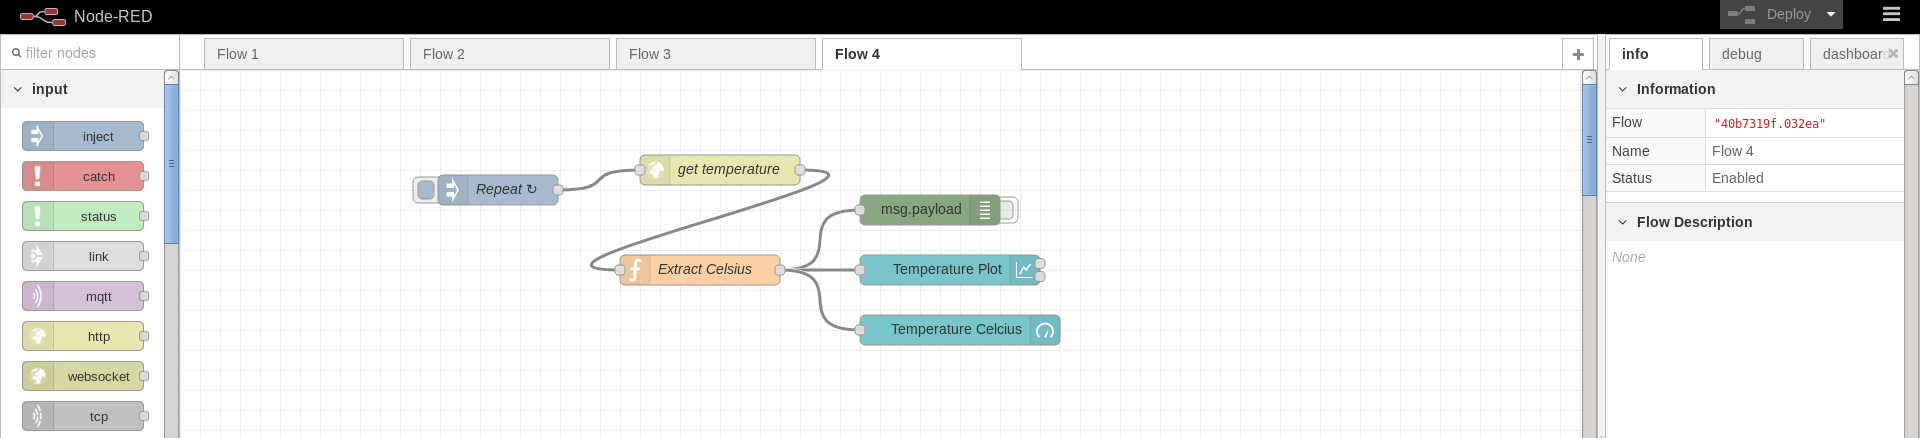
Programming Nodes and flows to achieve the desired display

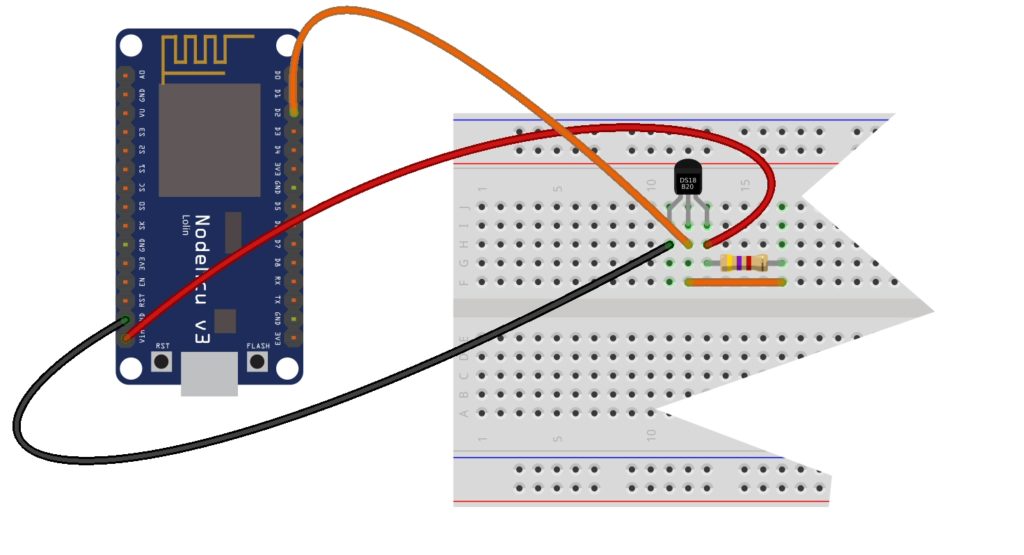
The hardware Wiring Diagram for the ESP8266 and DS18B20 for what we want to achieve. Note the 4.7K pull up resistor.

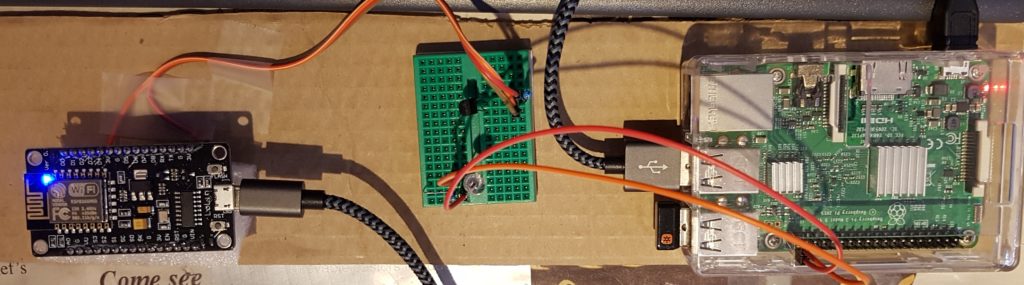
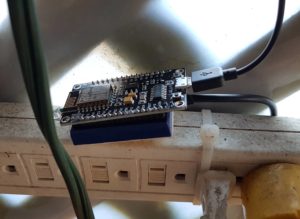
The Node-RED server/IDE for this demo is running on a Raspberry Pi.
Installing Node-RED on the Pi.
Node-RED is installed by default on recent versions of Raspbian. Unfortunately the Node.js it is running on is an older version and does not support the dashboard widgets we want to use.
Upgrading to the most recent version from From: https://nodered.org/docs/hardware/raspberrypi
- Create the following script with your favorite editor.
bash <(curl -sL https://raw.githubusercontent.com/node-red/raspbian-deb-package/master/resources/update-nodejs-and -nodered) - Lets say you put it into a file named getnodestuff.sh.
- do a chmod 755 to make it executable: chmod 755 getnodestuff.sh
- ./getnodestuff
- Get the Node-RED dashboard. Execute the following commands from the command line to:
- stop the Node-RED server,
- change to your Node-RED directory,
- ask the npm Node.js package manager to install node-red-dashboard,
- restart the Node-RED server
- node-red-stop
- cd ~/.node-red
- npm install node-red-dashboard
- node-red-start
Links that I borrowed stuff from:
- http://developers.sensetecnic.com/article/a-node-red-dashboard-using-node-red-dashboard/
- https://flows.nodered.org/flow/25af5334a79d6c02d6413968a8bff572
- http://www.instructables.com/id/Node-Red-Control-RaspberryPi/
Connecting to the Node-RED server on your Pi:
http://<ip address or domain>:1880
Programming the Nodes
What are the Nodes
- Nodes are programmed by dragging the desired node from the choices on the left to the work-space in the centre.

The above Nodes are used to create the user interface page widgets.
I have changed the title of these nodes to be more descriptive of
what each node does. In order to do this, you need to know the
name of the node in the menu (before they are changed):
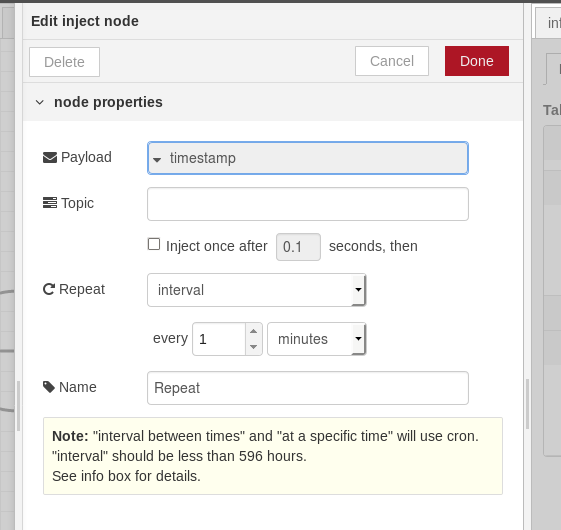
- The Repeat node is an inject node. It can be used to inject things into the flow. It can also be used to repeat actions. This is what we are interested in.
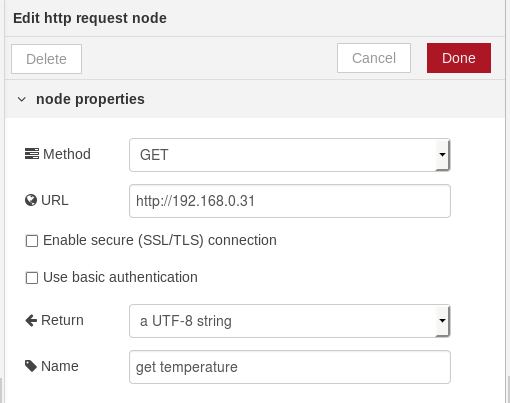
- The get temperature node is an http request node.It does exactly that – request a web page.
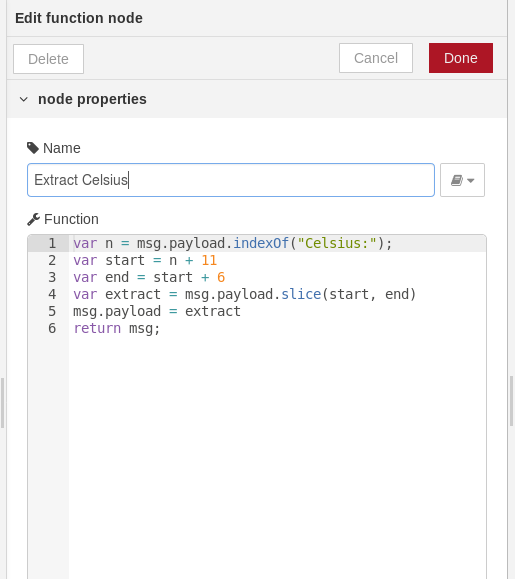
- The extract Celsius node is a function node. It allows JavaScript to be run against the input to produce the output. In this case, it extracts the Celsius temperature from all the data returned:
<!DOCTYPE HTML> <html> <head></head><body> <meta name=viewport content="width=device-width, initial-scale=1.5"> <h1>Temperature</h1><h3>Celsius: 1.87 °C</h3><h3>Fahrenheit: 35.38 °F</h3></body></html> - msg.payload is a debug node. It can display the current message to the debug window on the right side of the screen.
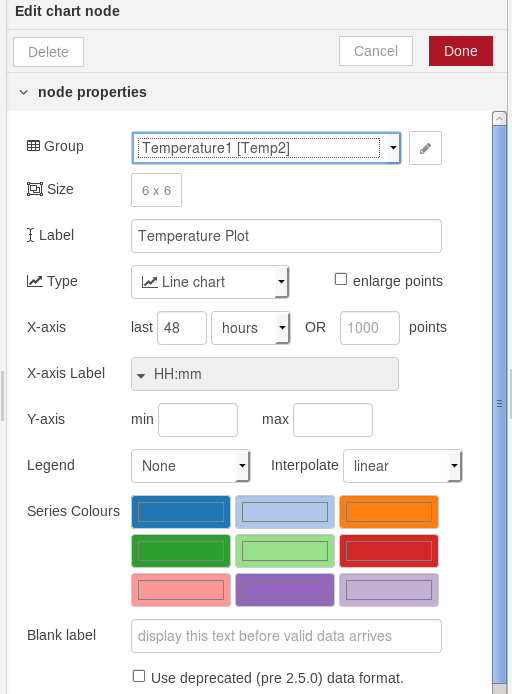
- Temperature Plot is a chart node. As you can see it produces a graph or plot or …
- Temperature Celsius is a gauge node. It displays a gauge widget.
Configuring the Nodes
Each of the Nodes needs to be configured to produce the desired flow and the resulting message
-
- Repeat

- get temperature

- extract Celsius

- msg.payload
- Temperature Plot

- Repeat
The Group Tab is important. It determines where on the User Interface this will be displayed.
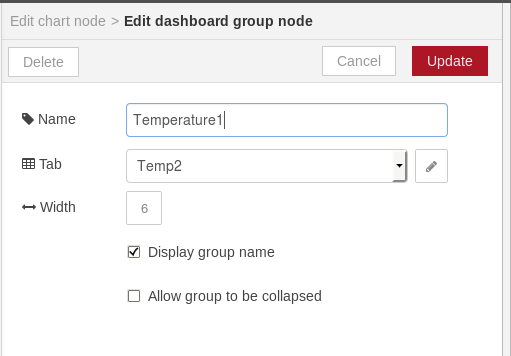
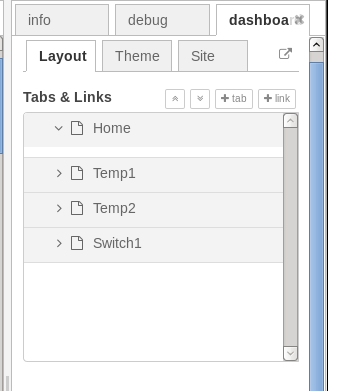
In the example I have created I have 3 tabs that show up on
different screens.
- 1. Temp1
- 2. Temp2
- 3. Switch1
The order can be changed by manipulating the layout the dashboard Layout on the far right of the screen:


Installing the Arduino IDE, ESP8266
To program the ESP8266 with the Arduino IDE you will have to install:
- The Arduino IDE and the ESP9266 Board manager see http://drsol.com/~deid/pi/esp1/Search for Arduino IDE
- the libraries OneWire (https://github.com/PaulStoffregen/OneWire) and DallasTemperature (https://github.com/milesburton/Arduino-Temperature-Control-Library)
How to install libraries: https://www.arduino.cc/en/Guide/Libraries
- https://github.com/PaulStoffregen/OneWire/archive/master.zip
- https://github.com/milesburton/Arduino-Temperature-Control Library/archive/master.zip
The code Arduino IDE Code
/*********
Rui Santos
Complete project details at http://randomnerdtutorials.comRunning on ESP8266 12-E LoLin Development Board
Modified by D.Reimer 2017-08-14
************/// Include the required libraries
#include <ESP8266WiFi.h>
#include <OneWire.h>
#include <DallasTemperature.h>// Wifi Credentials
const char* ssid = “lalala”;
const char* password = “xxxxxxxxxxxxxxxxx”;IPAddress ip(192,168, 0, 31);
IPAddress gateway(192, 168, 0, 1);
IPAddress subnet(255,255, 255, 0);// led gpio pin – high during web serving except the onboard led
int led = 2; //Onboard Led// Data wire is connected to D2/GPIO 4
#define ONE_WIRE_BUS 4// Setup a oneWire instance to communicate with any OneWire devices (not just Maxim/Dallas temperature ICs)
OneWire oneWire(ONE_WIRE_BUS);// Pass our oneWire instance reference to the Dallas Temperature routine
DallasTemperature DS18B20(&oneWire);// Create variables to hold the temperature measurements
char temperatureCString[8];
char temperatureFString[8];// Create a Web Server on port 80
WiFiServer server(80);// Setup function
void setup() {
// Set gpio pin 2 to output for led and set it high to turn it off?
pinMode(led, OUTPUT);
digitalWrite(led, HIGH);// Initialize serial port for debugging
Serial.begin(9600);
delay(10);// Start the 1wire temperature library
// IC Default 9 bit. If you have troubles consider upping it 12. This ups the delay giving the IC
// more time to process the temperature measurement
DS18B20.begin();// Connect to the WiFi network and display the IP.
Serial.println();
Serial.print(“Connecting to “);
Serial.println(ssid);
WiFi.begin(ssid, password);
// Config static IP.
WiFi.config(ip, gateway, subnet);
while(WiFi.status() != WL_CONNECTED) {
delay(500);
Serial.print(“.”);
}
Serial.println(“”);
Serial.println(“WiFi connected”);
Serial.println(WiFi.localIP());// Start the web server
server.begin();
Serial.println(“Web server running”);
delay(2000);
}
// Define function to get the Celcius and Farenheit temperature
void getTemperature(){
float tempC;
float tempF;//Turn on the led. When using the on board led the logic is reversed.
digitalWrite(led, LOW); // turn the LED on (HIGH is the voltage level)// Loop until the temperature is on out of range
do {
DS18B20.requestTemperatures();
tempC = DS18B20.getTempCByIndex(0);
dtostrf(tempC, 6, 2, temperatureCString);
//Serial.println(temperatureCString);
tempF = DS18B20.getTempFByIndex(0);
dtostrf(tempF, 6, 2, temperatureFString);
Serial.print(tempC);
delay(1000);
} while (tempC == (-127.0));// Turn off the led.
digitalWrite(led, HIGH);
}// Process function
void loop() {
// Listen for a web client
WiFiClient client = server.available();
// If there is a client then:
if (client) {
Serial.println(“New client…”);//Assume the ending blank line has been encountered.
boolean blank_line = true;//
while (client.connected()) {
if (client.available()) {// Read a request from the client
char c = client.read();// If end of request get the temperature and display it.
if (c == ‘\n’ && blank_line) {
// Send httpd header.
getTemperature();
client.println(“HTTP/1.1 200 OK”);
client.println(“Content-Type: text/html”);
client.println(“Connection: close”);
client.println();// Send the html
client.println(“<!DOCTYPE HTML>”);
client.println(“<html>”);
client.println(“<head></head><body>”);
client.println(“<meta name=viewport content=\”width=device-width, initial-scale=1.5\”>”);
client.println(“<h1>Temperature</h1><h3>Celsius:
“);
client.println(temperatureCString);
client.println(“°C</h3><h3>Fahrenheit: “);
client.println(temperatureFString);
client.println(“°F</h3></body></html>”);
break;
}
// If this is an empty line, then set blank_line true.
if (c == ‘\n’) {
blank_line = true;
// and not a carriage return, then it is the empty line indicating end of http
} else if (c != ‘\r’) {
blank_line = false;
}
}
}
//close the client connection
delay(1);
client.stop();
Serial.println(“Client disconnected.”);
}
}
ESP8266 NodeMCU Lolin Pinouts and GPIO


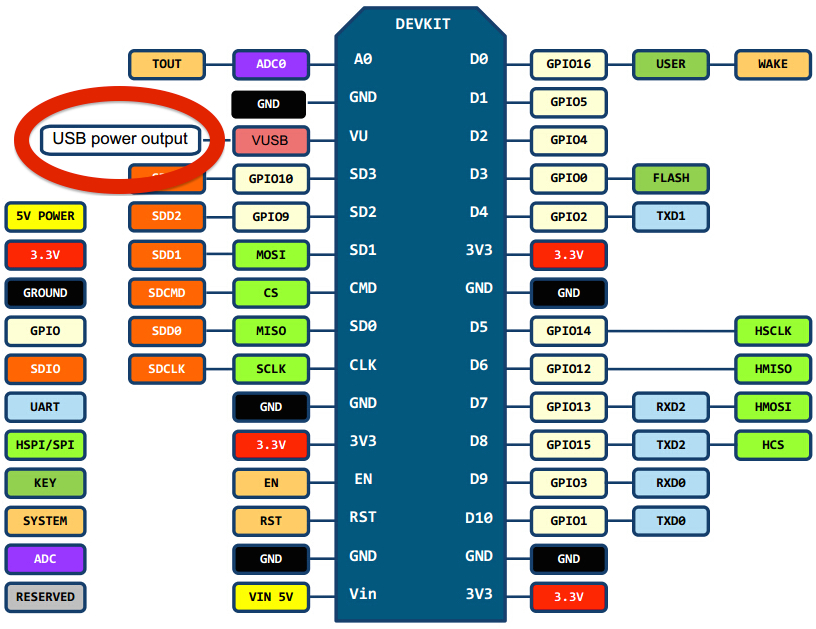
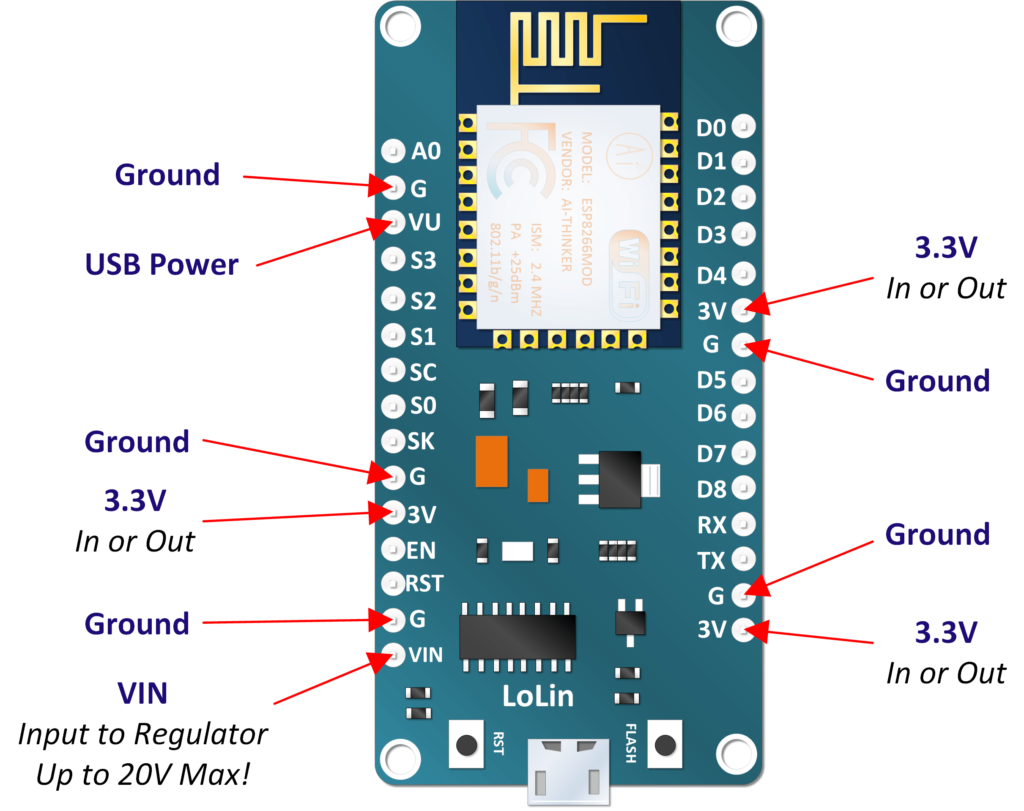
Note that the GPIO pin numbers are not the same as the D pin numbers on the Lolin NodeMCU. Go figure.
Where to get the parts
AliExpress
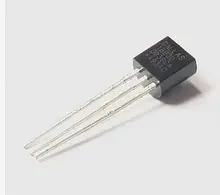
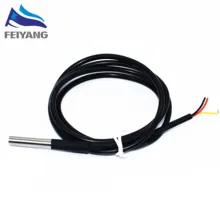
10PCS/LOT DS18B20 18B20 Programmable Resolution
-
C$ 6.58/ lot
10 pieces / lot
Free Shipping
-
C$ 1.18/ piece
- Shipping:
- C$0.25 / piece via China Post Ordinary
Small Packet Plus

-
C$ 15.79 / lot 10 pieces / lot Free Shipping
Amazon.ca
-
Haiworld 6pcs 170
tie point + 1pc 830 tie point Solderless Circuit Breadboard + 40P 20cm Wire Jumper Cable 1P-1P
Male-Male/Female-Female/Female-Maleby HaiworldGet it
by Friday,Mar 9

Amazon.ca
-
kuman 17 Values 1% Resistor Kit
Assortment, 0 Ohm-1M Ohm (Pack of 525)with 5x7cm
Solder Finished Prototype PCB Circuit Board
Breadboard for Arduino Rasbperry pi 3 2 1 Model
B B+ A DIY K78by kumanGet it
by Friday,Mar 9

